


OAuth stands for Open Authorization and is a framework that allows applications or websites to access basic user information from a trusted service provider—Google being one of the most popular. This enables users to log in without needing to create and remember a password for multiple sites.
Basic OAuth Flow
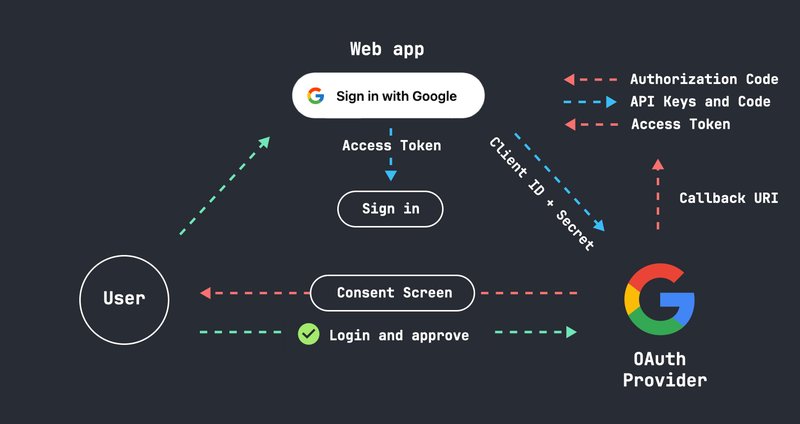
- The user clicks on a sign-in button.
- This button triggers an authorization request to a social account provider (e.g., Google), including the client ID and secret.
- The provider (Google) then presents a consent screen, where the user logs into their Google account and approves the request.
- After permission is granted, Google redirects the user to the callback URI, which includes an authorization code.
- The web app then sends its API keys (client ID, secret, callback URI, and authorization code) back to Google.
- Google validates the request and provides an access token to the web app.
- With this access token, the web app can make API requests on behalf of the user.
- The web app verifies and signs the user in.
At this point, the user is not technically authenticated yet. OAuth only grants permission to access the user’s data, but authentication requires an additional step.
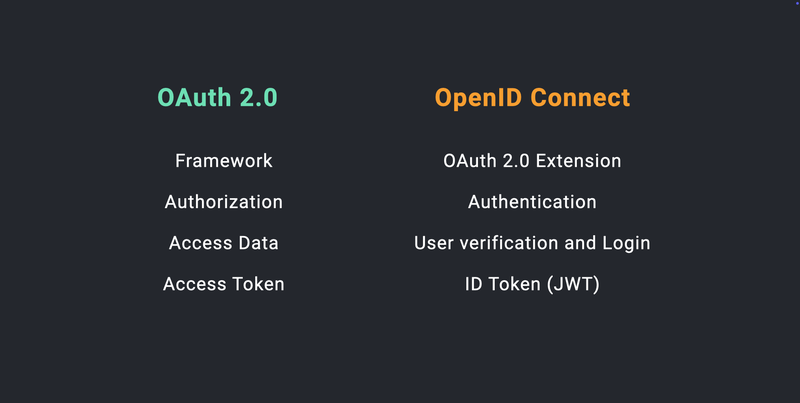
OAuth vs. OpenID Connect
OAuth is primarily an authorization framework, while OpenID Connect (OIDC) is an extension of OAuth that also authenticates the user. Here are the key differences:
Most providers support OAuth 2.0, but not all support OpenID Connect, leading to variations when implementing different login options.
Providers which support OpenID at this point in time include Google, Apple and Microsoft.
Setting Up OAuth in Django with Allauth
Django Allauth is a powerful authentication library that simplifies integrating OAuth with Django.
Installing and Configuring Django Allauth for SocialAccount
- Install Django Allauth:
pip install "django-allauth[socialaccount]" - Update Installed Apps in
settings.py:INSTALLED_APPS = [
'allauth',
'allauth.account',
'allauth.socialaccount',
'allauth.socialaccount.providers.google',
] - Create Client with Social Account Provider:
- Client ID
- Secret
- Callback URI : https://example.com/accounts/google/login/callback - Set Up OAuth Provider Credentials:
SOCIALACCOUNT_PROVIDERS = {
 'google': {
 'APP': {
 'client_id': env('OAUTH_GOOGLE_CLIENT_ID'),
 'secret': env('OAUTH_GOOGLE_SECRET'),
 },
 'SCOPE': [
 'profile',
 'email'
 ],
 'AUTH_PARAMS': {
 'access_type': 'online',
 'prompt': 'consent'
 },
} - Add social account link:
 {% load socialaccount %}
 {% provider_login_url 'google' %}
Differences Between OAuth Providers
Different providers have unique implementations of OAuth:
- Google: The standard implementation, supports OpenID Connect, allowing full authentication and login.
- GitHub: Simple integration but does not support OpenID Connect, meaning additional steps are needed to authenticate users.
- X (Twitter): Still relies on OAuth 1.0 to request email addresses. OAuth 2.0 exists but is not fully implemented yet.
- Facebook: The strictest provider, requiring a registered and verified business, along with a full app review before going live.

Conclusion
Using Django Allauth, you can easily integrate OAuth authentication into your Django project, supporting multiple providers. While OAuth provides authorization, OpenID Connect ensures authentication, making login seamless. Each provider has its own quirks, so understanding these differences is crucial for a smooth implementation. I had my own headaches trying to get them all to work :)
Stay curious my friends!