Integrating Stripe with Django offers a reliable way to manage secure payments in your web application. This guide walks you through setting up a payment system in Django using Stripe, where user payment information is stored in a model and a checkout session handles payment flow. You’ll learn to configure Stripe’s checkout session, and save essential transaction data in the database.
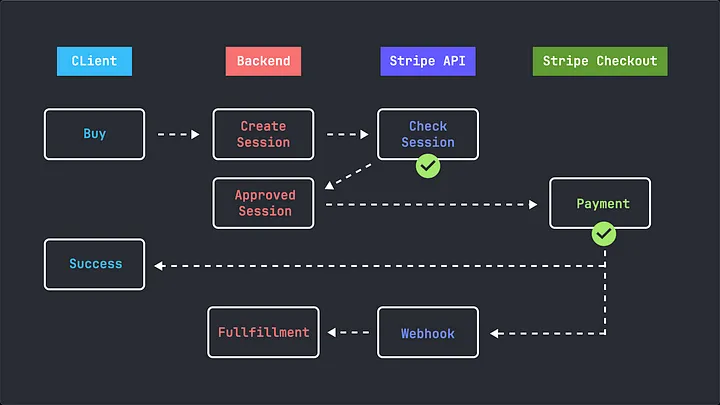
The Stripe payment workflow generally follows these steps:
- User Action: The user selects an item on the website and clicks a “Buy” button.
- Session Creation: This action triggers a request to the Django backend, which calls the Stripe API to create a checkout session.
- Stripe API Response: The Stripe API validates the session and returns a session object to the backend.
- Redirect to Stripe Checkout: The user is redirected to Stripe’s secure checkout page to enter payment information.
- Payment Processing: Stripe processes the payment. If successful, the user is redirected to a success page or a cancel page if they abandon the checkout.
- Webhook Notification: Upon successful payment, Stripe sends a server-side webhook notification to the Django backend, which can update records or trigger further actions.
Creating the Payment Model
To manage transactions, we’ll create a UserPayment model that records details of each payment, such as product name, quantity, and whether the payment was successful.
class UserPayment(models.Model):
 user = models.ForeignKey(User, on_delete=models.CASCADE)
 stripe_customer_id = models.CharField(max_length=255)
 stripe_checkout_id = models.CharField(max_length=255)
 stripe_product_id = models.CharField(max_length=255)
 product_name = models.CharField(max_length=255)
 quantity = models.IntegerField(default=1)
 price = models.DecimalField(max_digits=10, decimal_places=2)
 currency = models.CharField(max_length=3)
 has_paid = models.BooleanField(default=False)

 def __str__(self):
 return f"{self.user.username} - {self.product_name} - Paid: {self.has_paid}"
The model above will store critical information about each transaction, allowing you to track purchases made by each user. The has_paid field will update based on the success of the payment, while the stripe_checkout_id serves as a reference for each checkout session created.
Setting Up the Stripe Checkout Session
To create a payment, initiate a Stripe checkout session. Here’s how to create a session that includes product details and redirects users based on payment success or failure.
stripe.api_key = settings.STRIPE_SECRET_KEY
def create_checkout_session(request, price_id, quantity=1):
 checkout_session = stripe.checkout.Session.create(
 line_items=[
 {
 'price': price_id,
 'quantity': quantity,
 },
 ],
 payment_method_types=['card'],
 mode='payment',
 customer_creation='always',
 success_url=f'{settings.BASE_URL}{reverse("payment_successful")}?session_id= {{CHECKOUT_SESSION_ID}}',
 cancel_url=f'{settings.BASE_URL}{reverse("payment_cancelled")}',
 )
 return redirect(checkout_session.url, code=303)
Explanation of the Code
- line_items: The items being purchased, including the price ID and quantity.
- payment_method_types: Specifies that only card payments are accepted.
- mode: Set to 'payment' for one-time payments.
- customer_creation: Ensures a Stripe customer object is created for each checkout session.
- success_url and cancel_url: URLs to which Stripe redirects users after a successful or canceled payment attempt.
This method initiates the checkout process by redirecting users to Stripe’s secure payment page.
Handling Payment Success
Upon successful payment, Stripe will redirect users to a custom success URL, allowing you to verify the payment and update the UserPayment model.
Updating UserPayment After Success
In the payment_successful view, retrieve the session details and mark has_paid as True. Here’s the complete code snippet for this process:
def payment_successful(request):
checkout_session_id = request.GET.get('session_id', None) if checkout_session_id:
session = stripe.checkout.Session.retrieve(checkout_session_id)
customer_id = session.customer
customer = stripe.Customer.retrieve(customer_id)
line_item = stripe.checkout.Session.list_line_items(checkout_session_id).data[0]
UserPayment.objects.get_or_create()
UserPayment.objects.get_or_create(
 user = request.user,
 stripe_customer_id = customer_id,
 stripe_checkout_id = checkout_session_id,
 stripe_product_id = line_item.price.product,
 product_name = line_item.description,
 quantity = line_item.quantity,
 price = line_item.price.unit_amount / 100.0,
 currency = line_item.price.currency,
 has_paid = True
 )

 return render(request, 'a_stripe//payment_successful.html', {'customer': customer})
Explanation of the Code
- checkout_session_id: Retrieves the session ID from the URL query parameters.
- session: Fetches the session details from Stripe using the checkout session ID.
- customer_id: Extracts the customer ID from the session to get customer details.
- line_item: Retrieves line item details from the checkout session, including product information.
- UserPayment.objects.get_or_create(...): Creates a new UserPayment record or retrieves an existing one based on the user and session details.
This process ensures that all relevant payment information is saved in your database, maintaining a comprehensive record of transactions.

Conclusion
With these few steps, you’ve integrated Stripe with Django, allowing users to securely complete transactions and updating your database with relevant payment information. This integration provides a scalable and secure payment solution, simplifying financial interactions within your app.
Happy coding my friends!

